Friday, July 23, 2010

Old BBQ = water rocket launcher!


P.S. I'll be adding more build pics as I upload them....


So a friend was having a "water rocket party" and we, as dads, were going to build water rocket launchers. It wasn't a competition, per se, but rather a way to have enough launchers that even if one or two failed, every kid would have a chance to launch their rocket.

His idea was to take a bunch of 2 litre bottles and spray paint them white, then allow the kids to use Sharpie markers, duct tape and other craft items to customize (decorate) their rockets. Great fun, because every kid has a chance to do their own thing and yet have fun with the other kids, and a good chance of getting really wet when we launched the rockets.

During my design phase, I researched a bunch of launchers on the internet. Trust me when I tell you that there are alot of different designs to choose from. They all were practical and easy to build, but they lacked 2 things:

1. They were not built very "heavy duty". They were built to be used a few times and then discarded or rebuilt.
2. They were slow to load. Most of the designs required pouring the water into the bottle prior to being put on the launcher, then required connecting the compressed air and pressurizing.

My problem was that kids wanted to enjoy this, so it had to handle a certain amount of abuse. It had to be quick to load, because kids aren't typically known for having a great deal of patience.

When I was in high school shop class, we built this monstrosity of a water rocket launcher, with a welded steel frame and plumbed water and air feeds. It was great for a launching alot of rockets quickly and certainly was tough, but I didn't have the resources to build something like that in my garage.

My solution?

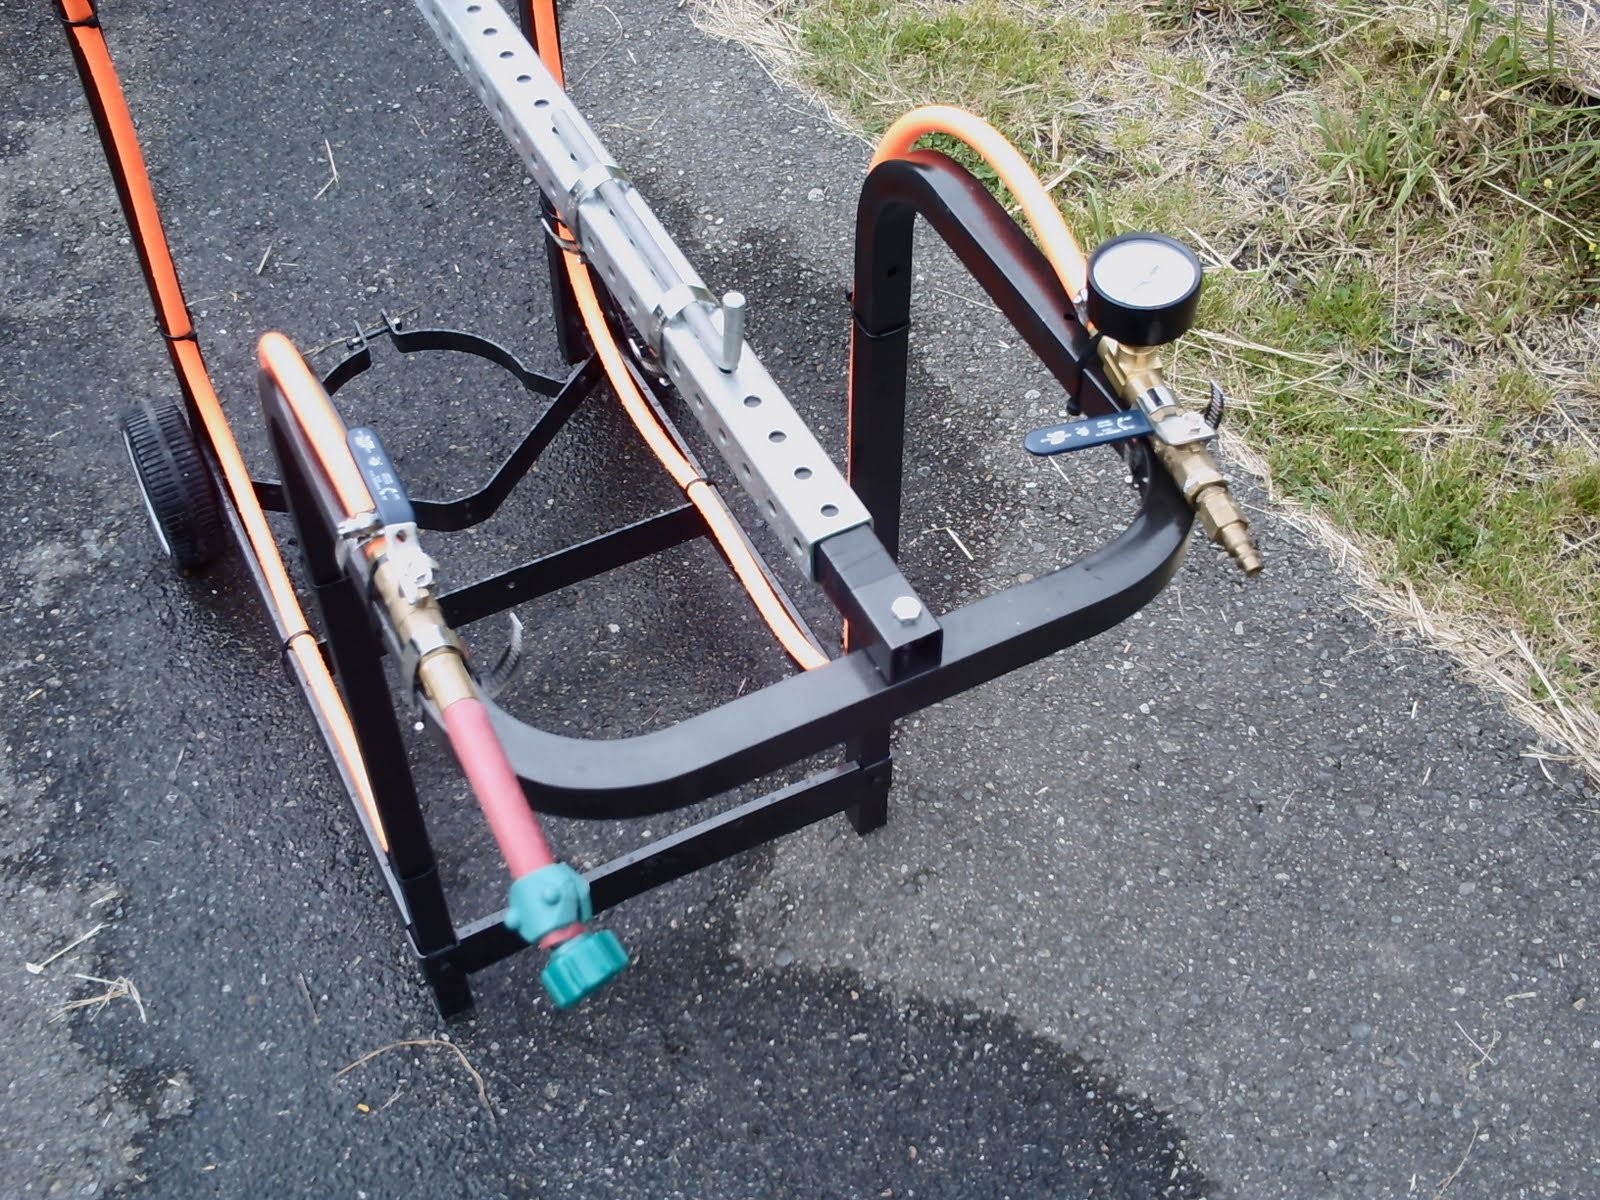
Retrofit my old BBQ to be used as a water rocket launcher! I'd use the BBQ as a frame and then use common hardware store items to create a "simple to use" water rocket launcher.

First, I separated the BBQ from the rest of the BBQ parts. Then, I used a drill and bolts to connect one square pipe running end to end.

Next, I confirmed that an outer square pipe fit around that first square pipe. This second pipe (they call it C channel?) would be my sliding mechanism and eventually act as a release for the bottle.

Next, I drilled a hole in the inner square pipe and installed a T fitting upside down. One input would be water, one would be air and the output (pointed up) would be the bottle. When building this T piece, I took a 2L bottle with me to the hardware store (in my case Lowes) to make sure what I was building actually fit. This would now act as my launch mount.

I bolted the launch mount loosely in place. At the hardware store, I purchased 2 ball valves, for controlling the input of both the water and the air, as well as some air hose (which would handle the necessary pressure) and connect my inputs to my launch mount.

Adding a bit more control, I installed a pressure gauge just beyond the input air valve so that I could measure the air pressure I'd be adding to the system.

Placing the bottle on my launch mount, I took an old metal tool and trimmed it with a hacksaw to act as a fork that would be able to hold and lock the bottle onto the launch mount. Using a carefully crafted piece of 2X4 wood, I was able to attach the fork onto the sliding mechanism using wire ties (AKA zip ties). I now had a working lock and release and decent inputs.

A few wire ties later (to attach the ball valve inputs to the frame) and I had a working mock up that I could actually demonstrate.


Please note: If you attempt anything like this own, you do so at your own risk. For example, the pressures involved can be unsafe for the 2L bottle, not to mention if you accidentally pressurize your home's water system. Understand the risks before proceeding with anything.

After I tested the mockup, I decided to change my launch mount so that it withstood slightly more pressure. After a trip to Lowes & a helpful employee named Vern, I used a few additional PVC fittings and a stack of rubber O rings and was able to get a pretty decent seal on the bottle. This required me using a taller 2X4 wood piece.

In the end, I tore everything down and painted the frame with some good Rustoleum paint (hammerlite finish to hide the imperfections). Putting it back together, I used wire ties to secure the air hose to the frame and used the right size of hose clamps to hold the input valves to the frame, the fork to the sliding mechanism, and each air hose on its respective fitting. Two more hose clamps to connect a handle to the sliding mechanism and I was ready! And I didn't forget to leave an air compressor quick connect so that we could easily connect and disconnect the compressor.


Shameless plug: Tire repair system that I think rocks:

Gryyp Emergency Puncture Tire Repair Systems


Monday, June 14, 2010

ARM Toolchain for libspmp8000

Here is a toolchain builder that I edited from http://www.gnuarm.com that will help people build an ARM toolchain to start building programs for the spmp8000 series devices like the JXD1000 JXD2000 and any of those types of devices made by Suncom. This is designed on and built for Ubuntu 10.04 LTS but should work on newer versions of Fedora (sorry...haven't tested that yet).

All directions are found within the script.

#!/bin/sh

## Script largely based on gnu-arm-installer but customized for building a toolchain for the smpm8000
## script customized by Paklids June 14 2010
## *** for future be aware of the versions of source archives used (like gcc and binutils) and try to match those as closely as possible to the versions running natively on your build machine ***

## Prerequisites
## download and install these to your distribution (based on Ubuntu for now)
## 1. apt-get install build-essential
## 2. apt-get install libpng3 libpng12-dev libncurses5-dev
## 3. apt-get install subversion
## (hope there isn't enything else I'm missing...)


## Steps to build toolchain
## 1. create a parent directory for your toolchain (using mkdir) and cd into it
## 2. create 3 subdirectories 'src' 'build' & 'install'
## 3. Download these source archives into the 'src' subdirectory but don't unpack
## ftp://ftp.gnu.org/gnu/gcc/gcc-4.4.3/gcc-4.4.3.tar.bz2
## ftp://ftp.gnu.org/gnu/binutils/binutils-2.20.1.tar.bz2
## ftp://sources.redhat.com/pub/newlib/newlib-1.18.0.tar.gz
## ftp://sourceware.org/pub/insight/releases/insight-6.8.tar.bz2
## 4. move this script to the toolchain parent directory & make this script executable (using something like chmod u+x ./custom-arm-toolchain)
## 5. Launch script & let it run for a long while
## 6. Make sure the ?/parent-dir/install/bin is in your $PATH. do an 'echo $PATH', then try an 'export PATH=/fullpathto/parent-dir/install/bin:$PATH', then test again using 'echo $PATH'
## 7. After this you should be able to issue the command 'arm-elf-gcc' and it should NOT complain about 'command not found'.


ROOT=`pwd`
SRCDIR=$ROOT/src
BUILDDIR=$ROOT/build
PREFIX=$ROOT/install

GCC_SRC=gcc-4.4.3.tar.bz2
GCC_VERSION=4.4.3
GCC_DIR=gcc-$GCC_VERSION

BINUTILS_SRC=binutils-2.20.1.tar.bz2
BINUTILS_VERSION=2.20.1
BINUTILS_DIR=binutils-$BINUTILS_VERSION

NEWLIB_SRC=newlib-1.18.0.tar.gz
NEWLIB_VERSION=1.18.0
NEWLIB_DIR=newlib-$NEWLIB_VERSION

INSIGHT_SRC=insight-6.8.tar.bz2
INSIGHT_VERSION=6.8
INSIGHT_DIR=insight-$INSIGHT_VERSION

echo "I will build an arm-elf cross-compiler:

Prefix: $PREFIX
Sources: $SRCDIR
Build files: $BUILDDIR

Press ^C now if you do NOT want to do this."
read IGNORE

#
# Helper functions.
#
unpack_source()
{
(
cd $SRCDIR
ARCHIVE_SUFFIX=${1##*.}
if [ "$ARCHIVE_SUFFIX" = "gz" ]; then
tar zxvf $1
elif [ "$ARCHIVE_SUFFIX" = "bz2" ]; then
tar jxvf $1
else
echo "Unknown archive format for $1"
exit 1
fi
)
}

# Create all the directories we need.
#mkdir -p $SRCDIR $BUILDDIR $PREFIX

(
cd $SRCDIR

# Unpack the sources.
unpack_source $(basename $GCC_SRC)
unpack_source $(basename $BINUTILS_SRC)
unpack_source $(basename $NEWLIB_SRC)
unpack_source $(basename $INSIGHT_SRC)
)

# Set the PATH to include the binaries we're going to build.
OLD_PATH=$PATH
export PATH=$PREFIX/bin:$PATH

#
# Stage 1: Build binutils
#
(
(
# autoconf check.
cd $SRCDIR/$BINUTILS_DIR

) || exit 1

# Now, build it.
mkdir -p $BUILDDIR/$BINUTILS_DIR
cd $BUILDDIR/$BINUTILS_DIR

$SRCDIR/$BINUTILS_DIR/configure --target=arm-elf --prefix=$PREFIX --disable-werror && make all install

) || exit 1

#
# Stage 2: Patch the GCC multilib rules, then build the gcc compiler only
#
(
MULTILIB_CONFIG=$SRCDIR/$GCC_DIR/gcc/config/arm/t-arm-elf

echo "

MULTILIB_OPTIONS += mno-thumb-interwork/mthumb-interwork
MULTILIB_DIRNAMES += normal interwork

" >> $MULTILIB_CONFIG

mkdir -p $BUILDDIR/$GCC_DIR
cd $BUILDDIR/$GCC_DIR

$SRCDIR/$GCC_DIR/configure --target=arm-elf --prefix=$PREFIX \
--enable-languages="c" --with-gnu-as --with-gnu-ld --with-cpu=arm926ej-s \
--disable-nls --disable-werror --disable-libssp --disable-libgomp --disable-libmudflap --disable-werror && make all-gcc install-gcc

) || exit 1

#
# Stage 3: Build and install newlib
#
(
(
# Same issue, we have to patch to support makeinfo >= 4.11.
cd $SRCDIR/$NEWLIB_DIR

) || exit 1

# And now we can build it.
mkdir -p $BUILDDIR/$NEWLIB_DIR
cd $BUILDDIR/$NEWLIB_DIR

$SRCDIR/$NEWLIB_DIR/configure --target=arm-elf --prefix=$PREFIX --disable-newlib-supplied-syscalls --disable-werror && make all install

) || exit 1

#
# Stage 4: Build and install the rest of GCC.
#
(
cd $BUILDDIR/$GCC_DIR
echo "*** Re-CONFIGUREing GCC ***"
$SRCDIR/$GCC_DIR/configure --target=arm-elf --prefix=$PREFIX \
--enable-languages="c,c++" --with-gnu-as --with-gnu-ld --with-cpu=arm926ej-s \
--disable-nls --disable-werror --disable-libssp --disable-libgomp \
--disable-libmudflap --with-newlib --with-headers=$SRCDIR/$NEWLIB_DIR/newlib/libc/include
sleep 60
echo "*** Re-MAKEing GCC ***"
make
make install
sleep 60

) || exit 1

#
# Stage 5: Build and install INSIGHT.
#

(
# Now, build it.
mkdir -p $BUILDDIR/$INSIGHT_DIR
cd $BUILDDIR/$INSIGHT_DIR

$SRCDIR/$INSIGHT_DIR/configure --target=arm-elf --prefix=$PREFIX --disable-werror && make all install

) || exit 1


export PATH=$OLD_PATH

echo "
Build complete! Add $PREFIX/bin to your PATH to make arm-elf-gcc and friends
accessible directly.
"